

So, you’ve mastered the art of prompting. You spent hours inside Midjourney, DALL-E, or a dedicated AI engine tweaking keywords until the machine finally spit out the absolute perfect logo concept. It’s got the right energy, the symmetry is gorgeous, and the client is ready to greenlight it.
Now comes the moment of truth. You open the file, zoom in by 400%, and reality hits you like a bucket of ice water. The edges are blurry, the lines have weird pixelated jitters, and a strange, muddy color artifact is lurking in the corner.
Welcome to the ultimate bottleneck of AI branding.
No matter how advanced AI image generators have become in 2026, the vast majority still suffer from a fundamental DNA limitation: they output raster pixels, not mathematical vectors. A flat PNG or JPEG cannot scale to a giant physical storefront pylon or be fed into a vinyl cutting machine.
Over here at logodesigninspo.com, we believe AI should speed up your workflow, not lower your technical standards. Here is your definitive production playbook for taking a flat AI graphic and transforming it into a pristine, infinitely scalable, and fully editable vector file.
1. The Pre-Flight Check: Preparing the AI Raster
Before you attempt to vectorize an image, you need to optimize the source file. If you throw a low-resolution, low-contrast image into a vectorizer, the software will generate thousands of chaotic, unnecessary anchor points, turning your file into an uneditable mess.
-
Upscale First: If your AI tool gives you a standard $1024 \times 1024$ pixel output, run it through an AI upscaler (like Topaz Gigapixel or a built-in upscaler) to blast it up to at least $4000 \times 4000$ pixels. More pixels mean sharper edges for your tracing software to detect.
-
Boost the Contrast: Open the asset in Photoshop or a free raster editor. Toss a Levels or Curves adjustment layer over it. Turn up the whites and crush the blacks. The goal is to make the boundary line between your logo icon and the background as razor-sharp and high-contrast as humanly possible.
2. Choosing Your Vectorization Pipeline
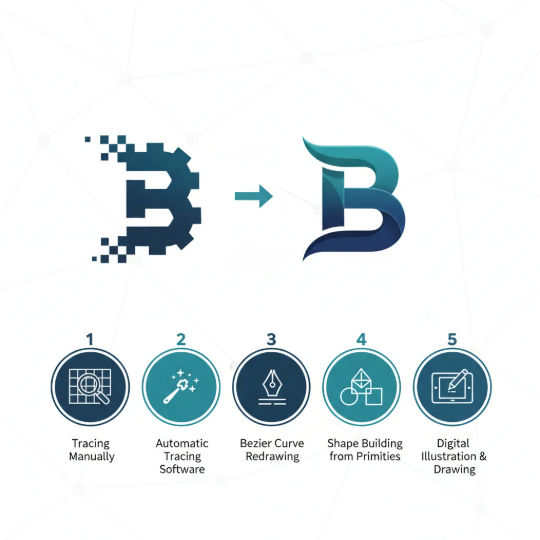
Depending on your budget, timeline, and skill level, you have three distinct technical paths to choose from when converting pixels to math.
Path A: Dedicated AI Vectorizers (The Fast Lane)
Tools like Vectorizer.ai have completely revolutionized the handoff pipeline. Unlike legacy tracing software, these tools use deep learning to predict where geometric primitives (circles, straight lines, clean arcs) are supposed to exist.
-
Best For: Complex icons with multiple overlapping color paths or organic curves.
-
The Verdict: Fast and surprisingly clean, though you will still need to manually inspect the nodes afterward.
Path B: Adobe Illustrator Image Trace (The Legacy Standard)
The time-tested industry workhorse. Bring your high-contrast image into Illustrator, select it, and open the Image Trace Panel.
-
The Magic Settings: Change the Mode to Black and White (even if your final logo is color—remember the monochrome rule!). Crank the Paths setting up to 90%, drop the Corners down slightly to avoid jagged artifacts, check the Ignore White box, and hit Expand.
-
The Verdict: Perfect for minimalist silhouettes, but requires manual fine-tuning if the source graphic has complex shading.
Path C: The Pen Tool Rebuild (The Pure Professional Route)
If the AI-generated logo is built out of straightforward geometric shapes, the cleanest method is to ignore automated tracing software entirely. Lock the AI image onto a bottom layer at 30% opacity and use it purely as an alignment guide. Reconstruct the logo from scratch using perfect vector primitives—circles, rectangles, and precise grid constraints.
-
The Verdict: It takes the longest, but it delivers an absolutely perfect, production-grade master file that passes every enterprise-level audit.
📊 Direct Comparison: Automated Tracing vs. Manual Rebuilding
To help you manage your production timeline, look at how the different vector conversion strategies stack up across core technical metrics:
| Technical Metric | Automated AI Vectorizers | Illustrator Image Trace | Manual Geometric Rebuild |
| Production Speed | Ultra-Fast (Under 1 minute) | Fast (2-3 minutes) | Slow (20-60 minutes) |
| Anchor Point Density | Medium (Slightly noisy nodes) | High (Requires heavy cleanup) | Minimal (Perfect mathematical efficiency) |
| Symmetry Control | Decent (Approximate) | Poor (Follows pixel imperfections) | Flawless (Locked to grid constraints) |
| Editability Rating | Good | Fair | Excellent (Total handle control) |
3. The Post-Trace Clean-Up: Polishing the Geometry
If you chose an automated or algorithmic tracing path, your job is only half done. An automated trace leaves behind microscopic defects that reveal themselves when the logo is scaled up to billboard size.
Follow this post-trace audit checklist to guarantee structural perfection:
🛠️ The Vector Polish Checklist
1. Delete the “Phantom” Shapes
Switch to Outline Mode (
Cmd+YorCtrl+Y). Look for invisible, stray vector paths that the tracing engine generated in the negative spaces. Select and delete them to keep your layer panel clean.2. Align the Anchor Nodes
Tracing software loves to place anchor points at weird, arbitrary locations along a curve. Grab the Delete Anchor Point Tool and eliminate redundant nodes. Keep your anchor points strictly at the outermost horizontal and vertical apexes of your shapes.
3. Enforce Perfect Horizontals & Verticals
Select your Bezier handles on symmetrical curves. Ensure they are snapped to perfect $0^\circ$, $45^\circ$, or $90^\circ$ constraints using your software’s alignment modifiers. If a line is supposed to be perfectly straight, ensure its coordinates match identically on the grid.
4. The Final Separation: Decoupling Typography
Here is a piece of absolute candor: Never use the text generated inside an AI art tool. AI text generation is getting better, but it is still highly prone to kerning errors, lumpy letter strokes, and inconsistent weights.
If your AI logo output contains integrated typography, execute an immediate separation protocol:
[AI Output with Embedded Text] ➡️ Vector Trace ➡️ Slice Off AI Text ➡️ Replace with Fresh, Clean System Fonts
Trace only the icon or symbol. Once the symbol is a pristine vector, delete the AI-generated typography entirely. Open a fresh text layer and type out the brand name using a premium, legally licensed font family (following the rules from our Typography 101 Guide). Manually adjust the kerning, tracking, and vertical alignment to create a balanced, professional corporate lockup.
By taking the extra 20 minutes to bridge the gap between creative AI ideation and technical vector engineering, you elevate your work from a casual digital concept to a bulletproof, high-performance visual asset ready for the real market.


Leave a Reply